# Materials
As will be explained in painful amounts of detail in the Blender sections (should you choose to read them), materials are a way to handle all of the visual properties of a mesh. For right now, we’re just going to use existing materials and not really worry about what they’re made of. To make your own, see the Custom Materials section.
# Built-In Materials
UDK supplies a number of materials which are great for testing things out. The default material is the infamous gray and blue grid, and there are a number of others that are commonly used in mapmaking (for better or for worse).
However, not all of these are created equal. Rocket League has a package which is a consolidated subset of the UDK built-in materials. In other words, not all of these will work unless you copy extra .upks into {CookedPCConsole}. Since we can’t force people who play on our maps to do this extra step, the best practice is to not use them.
A lovely modder by the name of Derzo put together this spreadsheet (opens new window), which explains the situation with all of UDK’s standard materials.
This will be explored in much more detail in the Custom Materials section.
# Making a Solid Color Material
To create a plain old solid color, you will follow most of the exact same steps as creating a full custom, textured material, just without the part where you use a custom texture.
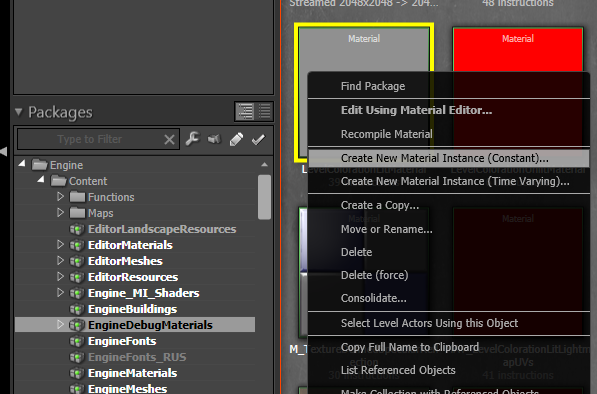

In the Content Browser, find the material called LevelColorationLitMaterial inside Engine > Content > EngineDebugMaterials. Right click it, and select “Create New Material Instance (Constant)...” In the popup window, type or select your map package. “Grouping” is a sub-package location for this object (not required, but can be useful). Give it an obvious and unique name, then click OK.
A Material is a model of all the ways that the surface of an object will interact with light. This includes color, shininess, transparency, subsurface scattering, anisotropy, and a whole list of other features. A Material Instance uses the same underlying material properties of its base, but allows you to modify certain exposed parameters (in this case, the color). The Content Browser should jump to this newly created material, which is inside your own map package. Make sure that it’s where it should be.

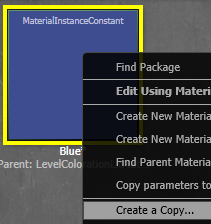
Double click the Material Instance, and you will bring up the Material Instance Editor. Find the Color parameter in the left panel. Change the color to your choice. Click the checkbox to overwrite the default color with what you have picked (i.e. to actually change the color). The preview ball will change, as will any objects in your map that are already using this.
To create a second material, right click the Material Instance and select “Create a Copy…” Follow the same steps to pick a different color.
If you want to make a material that will always stay exactly the color you pick, regardless of lighting, use LevelColorationUnlitMaterial as the base. This can be useful for indicators, text, outlines/trim, or surreal effects.
# Premade Materials
We’re going to put a grass material on the ceiling, and a glass material on the floor. The walls will be something wild.

In the Content Browser, search for “grass” within the Park_P package. It can also help to filter down to only Materials and Material Instances (Constant). Remember to clear these filters when you need to search for something else. Select GrassAndBush_Mat. Select the ceiling, and press F4 to bring up its properties. Search for “mater” and assign this to its first Materials slot using the green arrow.
Bibliothèque d'Alexandrie
The library allows you to see the map's content and find the name of what you want to get. You can then report the name into UDK to find the material you're looking for in the right package! You can find the library here.
How to use
It's the same process as testing a map. You can overwrite a map (e.g. Labs_Utopia_P) with a library file, start the game and go to freeplay on this map.
The library map is divided in 3 parts for now: The Particles on the left, the Materials in the middle and the Material Instances on the right.
If you drive into a particle cube, the particle effect will be triggered and you'll get the particles name. If you drive into a material cube, the material name will be displayed.
Then go back to UDK, fully load the map package you want and write the name in the research bar.
TIP: Use Bakkes Mod to spot the materials specifically made for the different teams (some particles/materials don't work)
This will appear as basically a solid color in the editor. We are unable to use fully custom materials in Rocket League, which means that you just have to deal with this for now.
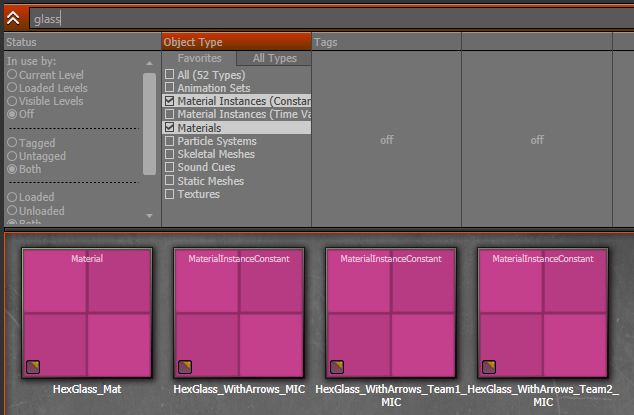
Next, select the floor. Assign it a material called HexGlass_Mat.
Lastly, select all the walls with Ctrl+click. Assign DarkMetal_Mat to all of them at the same time.
Save the map and test it out!

Well, it looks pretty good, but it needs a little je ne sais quoi. Let’s get to one of the most neglected aspects of map design: Lighting!