# Collidable Collisions
# Option 1 - Add a Blocking Volume
UDK has a nice feature for our exact problem. Using existing StaticMesh geometry, it can create a brush which has the same shape and then instantly create a BlockingVolume.
Save now (File > Save Current Level, not Ctrl+S), if you haven’t in a while. UDK likes to crash when doing this process.
Right click the floor > Create Blocking Volume > Auto Convex Collision...
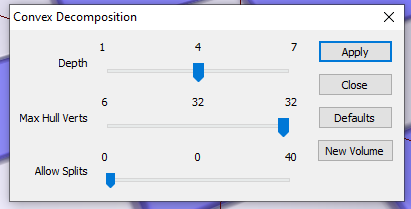
Change a few of the sliders so that the bounding box is more precise. We specifically want Splits to be 0 so that it is one solid collision box rather than a nonsensical archipelago.
Click Apply to set the brush to this shape, and then New Volume to spawn a BlockingVolume.
Don’t forget to apply the StickyWalls© Physical Material to the correct slot of the new collision box. If you don’t have StickyWalls© on the ground, you’ll find yourself getting airborne much easier (which could be desirable for certain maps, but not this one). The brush is in maroon, and you will have to move it before you can select the newly created collision box. Or, you could select the BlockingVolume in the Scene tab of the Content Browser. If it isn’t in the list, Save All should make it show up.
Save Current Level and update the renamed map inside {CookedPCConsole}. You have a working floor.
# Option 2 - Swap in Collision_Floor
I personally find it much cleaner to collide with meshes themselves, rather than placing meshes and additional physics objects which are the same shapes. One reason you might prefer the Option 1 route would be to optimize for incredibly elaborate meshes (e.g. a Terra Cotta Army map or something). However, a flat plane is not an elaborate mesh, so I believe this is a better solution.

Inside the Park_P dummy assets package, find a StaticMesh called Collision_Floor. Select the floor StaticMesh in the 3D viewer and open its properties. Search for “mesh.” Click the green arrow to trade out the floor’s Static Mesh Component for the new one.
Because the object origin is different (corner vs. center… thanks Psyonix), it will appear in a different location than before.
Change the location to (4350, 4615, -544) and it should magically be where it was.
To be thorough, we’ll also fine-tune the wall segment. Right click it > Transform > Snap To Floor (or alternatively, press End).
The beautiful thing about this approach is that you do not have to reapply StickyWalls™ or even worry about those Rigid Body checkboxes. It should keep all of the same properties from before. However, it’s good to confirm, because sometimes they toggle themselves anyway.
However, Collision_Floor does not have the same UV Map (more on these later) as Concrete_Base. Notice that the checker pattern is much smaller. This means that any texture details on it will be much smaller.
But, for now, it’s just nice to have a floor to drive on. Test it out!
# Option 3 - Make Our Own Floor
To get the best of both worlds - a mesh we can collide with that also looks the way we want - the best way is to do it ourselves. For any and all 3D asset creation, this guide is going to show you how to use Blender because Blender is bae (not to mention 100% free and incredibly powerful).
This section will be a lightweight crash-course experience for both modeling and UV mapping. Please see the full Blender Guide for more information.
Blender Crash Course

In Blender, switch immediately to the UV Editing window layout on the top bar. The panel on the right is for editing 3D objects, and the panel on the left is for managing how 2D textures map onto the 3D object.

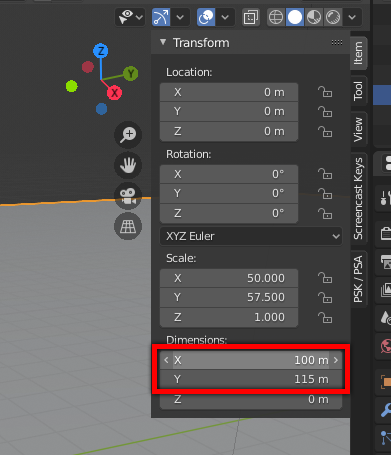
In Object Mode (press Tab so that the cube goes back to gray), delete the Cube and add a Plane. Press N to reveal the side toolbar, and in the Item tab, adjust Dimensions so that X is 100 meters and Y is 115 meters. This is roughly the size of the field in this weird Blender meters vs UDK units world that we live in.

Switch back to Edit Mode. Select the UV map in the left panel and scale it by something between 10 and 100 by typing “S 100 Enter”. It can be helpful to make a dummy material that looks like the UDK placeholder material to get a clearer picture of what you’re doing with this step, but more on that later as well.

Exit Edit Mode. Go to File > Export > FBX. Change the settings as indicated. Export your FBX to a location where you can easily find it, but that won’t cause a huge mess when you have hundreds of these in the future.
# Importing into UDK important
Once the mesh is made, head back to UDK to import it into the map package. Simply drag the FBX file onto the Content Browser window. Click OK (andmake sure you’re inside the right package). You should see a new asset appear within the viewer portion.

WARNING
You may see a warning about your FBX version (7.3.0 vs 7.4.0). This can be ignored and hidden in the future. (opens new window)
UDK will kindly try to figure out how to collide with these objects. But, remember that Psyonix replaced the whole physics engine, meaning that these checkboxes are dead to us. Double click the newly imported Static Mesh and change these settings:

Using the Static Mesh swap technique from Option 2, trade out the old floor for the new one. If you are doing Options 1, 2, and 3 like me, you will also have to move this back to (0,0,0).
Save Current Level, load it, and test it out!