Boost
List of Terms
What a sad place the world would be without boost. Luckily, it can be added and thoroughly customized. As is tradition, I will start with a list of terms:
Boost Pad- A glowing pad on the ground that gives you a little bit of boostBoost Pill- A hovering orb that gives you full boost (corner/mid boosts)VehiclePickup_Boost_TA- An actor which controls the logic of the boost pickupFXActor_Boost_TA- An actor which gives the visual appearance of the boost pickupStaticMeshActor- The solid object underneath the orange glowArchetype- A preconfigured asset
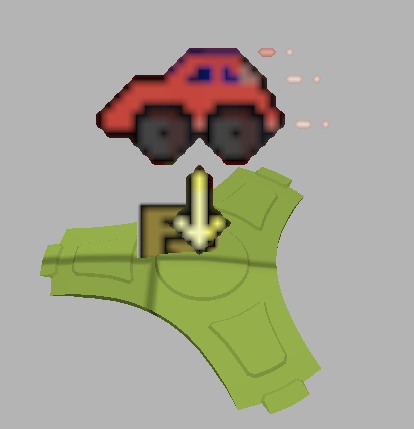 I wish it looked like this in game
The image shown above is a VehiclePickup_Boost_TA on top of an FXActor_Boost_TA and a StaticMeshActor. This one is a Boost Pill, as you can tell from the long legs on the model.
Boost Archetypes
Depending on which version of the Park_P dummy assets you are using, you may not have the VehiclePickup_Boost_TA archetypes available. Expand the Archetypes subfolder and look for VehiclePickup. Inside this folder should be two archetypes named VehiclePickup_BoostPillandVehiclePickup_BoostPad.
 Arche-typical setup
If these are not available, look instead inside HoopsStadium_P.Archetypes.VehiclePickup and use them instead.
Next, look inside Park_P.pickup_boost for similar archetypes named BoostPill_FXActor and BoostPad_FXActor.
 This season on FX...
Again, if these are not available for some reason, look instead in HoopsStadium_P.pickup_boost.
These archetypes are fully configured and are ready to be placed into the map. They have materials, animations, sound effects, and most importantly, will give you the right amount of boost.
Boost pickups on a standard Soccar map are at these locations. The ± symbol means that there is a pad at both +X and -X, or +Y and -Y, so placing the pickups listed below and mirroring them will make a complete set. Note that the VehiclePickup actors are at different heights for boost pads and pills. All FXActors are at 0 Z:
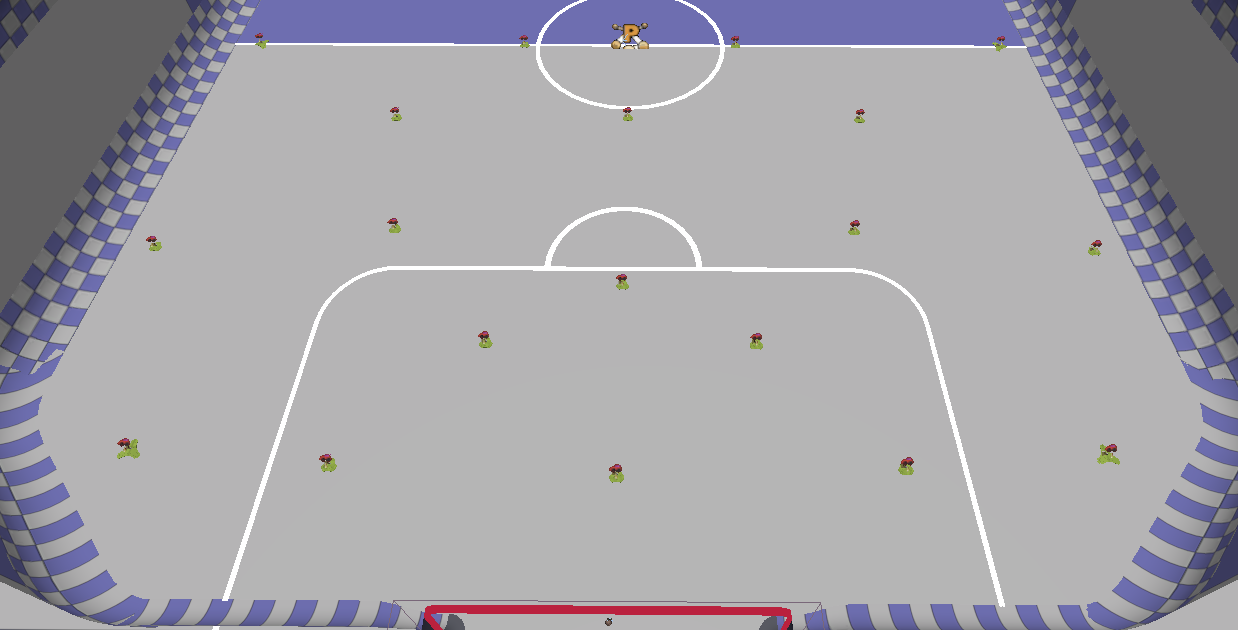 A heart in a box (see it?)
| Pickup Type | X | Y | Pickup Z |
|---|---|---|---|
| Pill | ±3072 | ±4096 | ±72 |
| Pill | ±3584 | 0 | ±72 |
| Pad | ±1792 | ±4184 | ±60 |
| Pad | ±940 | ±3308 | ±60 |
| Pad | ±1788 | ±2300 | ±60 |
| Pad | ±2048 | ±1036 | ±60 |
| Pad | ±3584 | ±2484 | ±60 |
| Pad | 0 | ±4240 | ±60 |
| Pad | 0 | ±2816 | ±60 |
| Pad | 0 | ±1024 | ±60 |
| Pad | ±1024 | 0 | ±60 |
Luckily, boost pickups behave better when mirroring than spawnpoints do. To create the symmetrical pickups, select the stack of objects, copy and paste them, right click, and select Transform > Mirror X/Y Axis.
WARNING
Whenever you copy and paste a set of boost objects, the new VehiclePickup_Boost_TA will not have the FXActor assigned automatically. You must go in and manually reassociate them.
Associating VehiclePickups and FXActors
If you tested your map immediately after adding these archetypes, you were probably disappointed because the boost stays visible after you pick it up. This is because each VehiclePickup_Boost_TA must be manually associated with each FXActor_Boost_TA. Sorry.
The most efficient way to do this for all boost pickups is with the Scene tab of the Content Browser.
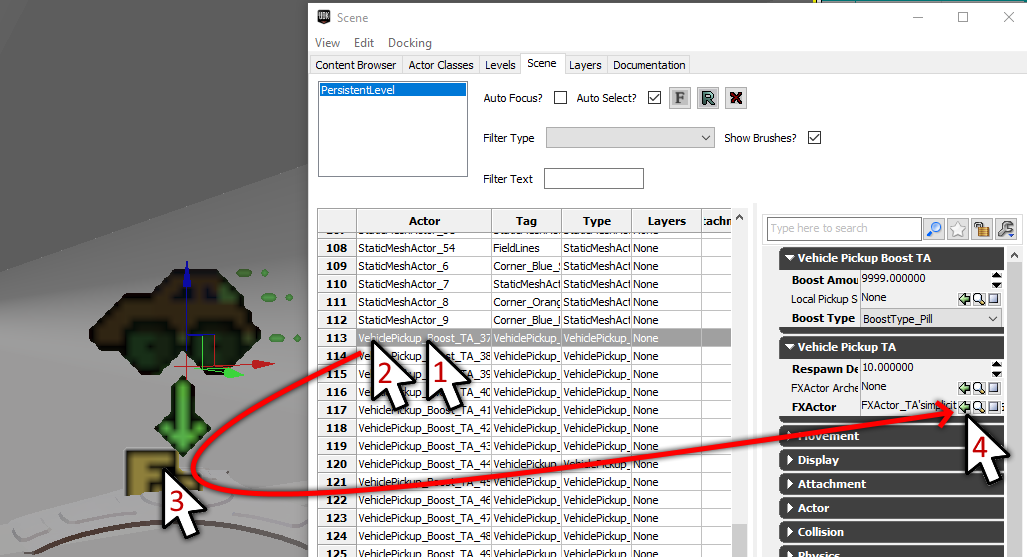 This will click eventually
Double click each VehiclePickup_Boost_TA object. This will transport the camera to it in the 3D viewer. Click the FXActor beneath the pickup. Then click the green arrow in the FXActor slot in the properties subwindow.
WARNING
Make sure you have literally anything other than the Park_P or HoopsStadium_P boost FXActor archetype selected in the Content Browser. Make sure you are assigning the FXActor that is physically placed in the map instead of the abstract concept of an FXActor. It should always start with FXActor_TA'yourMapName.
Custom Boost Pill
If you wish to create boost with custom functionality, perhaps with a different respawn time or boost amount, these values may be easily changed within the properties of each VehiclePickup_Boost_TA. For truly custom boost with a different appearance or hitbox, we must go deeper.
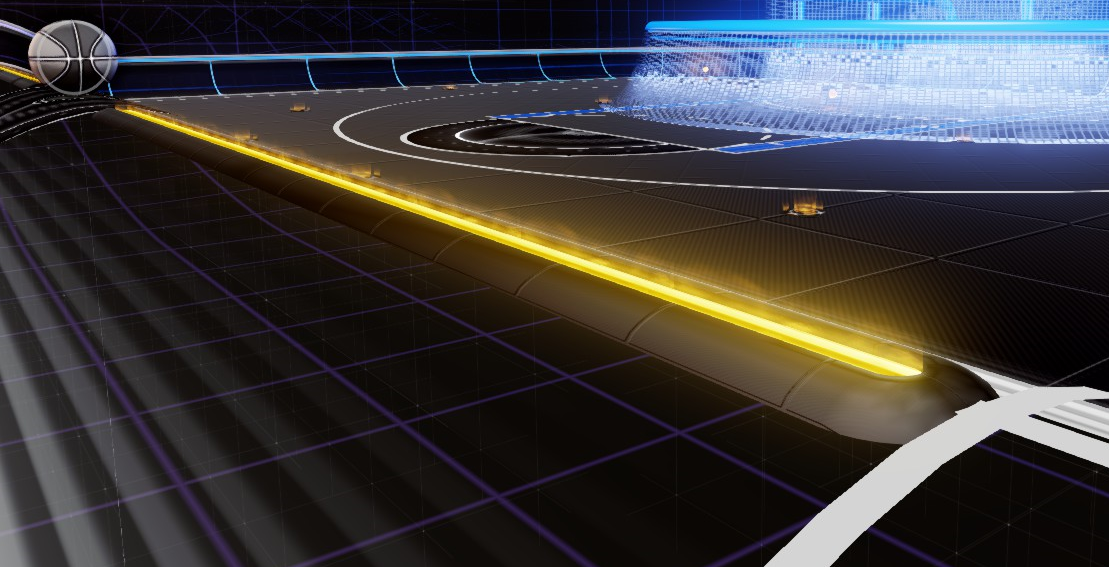 Booooooooooooooooooooost
First, find FXActor_Boost_TA in the Actors tab of the Content Browser. Drag it onto the map. Next, find VehiclePickup_Boost_TA and drag it onto the map. Last, add the Static Mesh named BoostPad_Large from the Park_P package. Or add your own custom mesh. You're unstoppable. However, note that this requires the FXActorEvents.upk dummy assets package, which was added to the GitHub Repository in 2021.
Pick the same X and Y location for all of these objects. Set the locations of the FXActor_Boost_TA and the Static Mesh to 0 in Z. Set the Z location of the VehiclePickup_Boost_TA to 72.
 Don't get too attached
Inside the properties of the FXActor_Boost_TA, add 3 Attachment slots. You may simply copy text from these tables, but please feel free to try substituting any of the Particle Systems or Static Meshes for a different one from the dummy assets.
Slot 0
Slot 0 will be the hovering ball of gooey boost, which is implemented as a particle system.
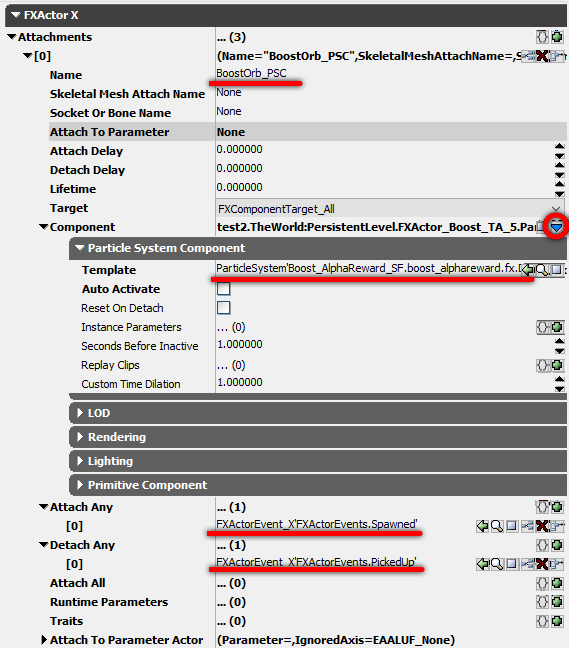 Particular settings
| Search for | Take this action | Set this value |
|---|---|---|
| Name | Type a name | BoostOrb_PSC |
| Component | Click blue arrow | ParticleSystemComponent |
| Particle System Component | Assign a Template | ParticleSystem'Park_P.pickup_boost.BoostOrb_PS' |
| Attach Any | Add a new item | FXActorEvent_X'FXActorEvents.Spawned' |
| Detach Any | Add a new item | FXActorEvent_X'FXActorEvents.PickedUp' |
When adding the ParticleSystemComponent, press P to quickly jump between items starting with P. Try out ParticleSystem'Boost_AlphaReward_SF.boost_alphareward.fx.Drive_PS' instead of the standard BoostOrb_PS (and set the Primitive Component's Pitch to -90 and Scale to 5).
Slot 1
Slot 1 will be the glow emanating from the base of the pickup, which is implemented as a mesh.
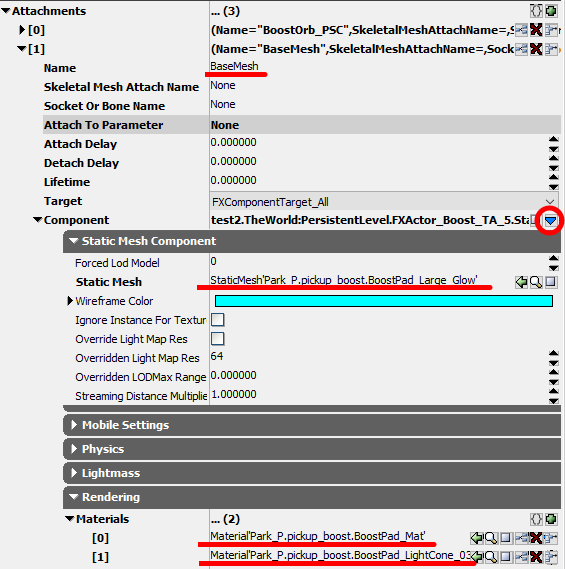 Meshy settings
| Search for | Take this action | Set this value |
|---|---|---|
| Name | Type a name | BaseMesh |
| Component | Click blue arrow | StaticMeshComponent |
| Particle System Component | Assign a Static Mesh | StaticMesh'Park_P.pickup_boost.BoostPad_Large_Glow' |
| Rendering | Add a Material slot | Material'Park_P.pickup_boost.BoostPad_Mat' |
| Rendering | Add a second slot | Material'Park_P.pickup_boost.BoostPad_LightCone_03_Mat' |
| Attach Any | Add a new item | FXActorEvent_X'FXActorEvents.Spawned' |
| Detach Any | Add a new item | FXActorEvent_X'FXActorEvents.PickedUp' |
Try replacing the BoostPad_Large_Glow mesh with your own model. The UV map for the LightCone material is exactly what you'd expect.
Slot 2
Slot 2 will be the effect that plays when the boost is picked up, which is implemented as a particle system.
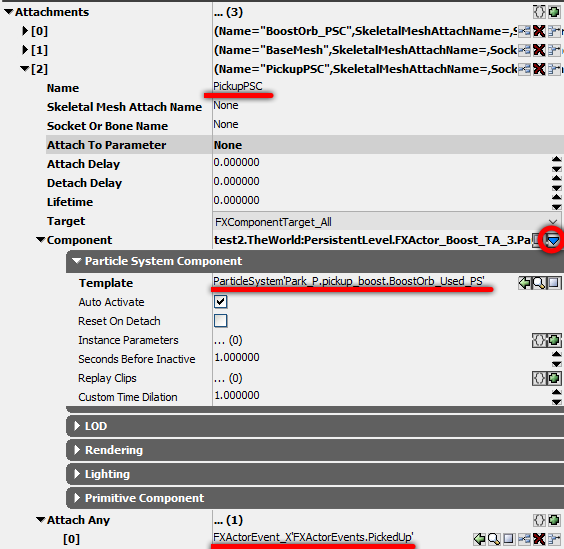 Particular settings part 2
| Search for | Take this action | Set this value |
|---|---|---|
| Name | Type a name | PickupPSC |
| Component | Click blue arrow | ParticleSystemComponent |
| Particle System Component | Assign a Template | ParticleSystem'Park_P.pickup_boost.BoostOrb_Used_PS' |
| Attach Any | Add a new item | FXActorEvent_X'FXActorEvents.PickedUp’ |
Note that the Attach Any triggers on PickedUp, which is the opposite of the other two attachments. That is because this plays only when the pickup happens.
Lastly, the FXActor needs one crucial change, otherwise it will never reappear visually:
| Search for | Change the line(s) | To this value |
|---|---|---|
| “del” | No Delete | Checked |
VehiclePickup_Boost_TA Properties
Next, there are some properties to set within the boost pill’s VehiclePickup_Boost_TA:
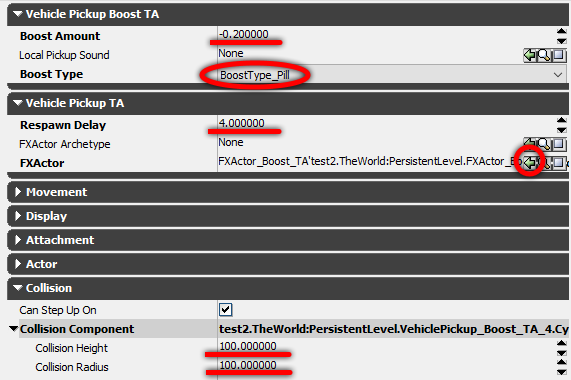 A little pick-me-up
| Search for | Change the line(s) | To this value |
|---|---|---|
| “loca” | Z | 72 |
| “boo” | Boost Amount | 9999 |
| “boo” | Boost Type | BoostType_Pill |
| “res” | Respawn Delay | 10 |
Lastly, lock the properties window. Select the FXActor_Boost_TA, then hit the green arrow. ![]() ! This tells the VehiclePickup which FXActor it should animate (and then hide) when a player passes through its hitbox. And speaking of the hitbox, it may be changed in the Collision section of the Properties window.
! This tells the VehiclePickup which FXActor it should animate (and then hide) when a player passes through its hitbox. And speaking of the hitbox, it may be changed in the Collision section of the Properties window.
Try creating Evil Boost with a negative Boost Amount. Fufufufu.
Custom Boost Pad
To create a boost pad, we will follow most of the same steps. This time, however, there are only two Attachments.
Slot 0
Slot 0 will be the glow emanating from the base of the pickup, which is implemented as a mesh.
| Search for | Take this action | Set this value |
|---|---|---|
| Name | Type a name | BaseMesh |
| Component | Click blue arrow | StaticMeshComponent |
| Particle System Component | Assign a Static Mesh | StaticMesh'Park_P.pickup_boost.BoostPad_Small_02_SM' |
| Rendering | Add a Material slot | Material'Park_P.pickup_boost.BoostPad_LightCone_03_Mat' |
| Rendering | Add a second slot | Material'Park_P.pickup_boost.Materials.BoostOrb_Glow_Mat' |
| Attach Any | Add a new item | FXActorEvent_X'FXActorEvents.Spawned' |
| Detach Any | Add a new item | FXActorEvent_X'FXActorEvents.PickedUp' |
Note that the order of the materials is swapped from the boost pills. Thanks Psyonix.
Slot 1
Slot 1 will be the effect that plays when the boost is picked up, which is implemented as a particle system.
| Search for | Take this action | Set this value |
|---|---|---|
| Name | Type a name | PickupPSC |
| Component | Click blue arrow | ParticleSystemComponent |
| Particle System Component | Assign a Template | ParticleSystem'Park_P.pickup_boost.BoostPad_Used_PS' |
| Attach Any | Add a new item | FXActorEvent_X'FXActorEvents.PickedUp’ |
Lastly, the FXActor_Boost_TA needs that same crucial change, otherwise it will never reappear visually:
| Search for | Change the line(s) | To this value |
|---|---|---|
| “del” | No Delete | Checked |
VehiclePickup_Boost_TA Properties
Set these values for the boost pad’s VehiclePickup_Boost_TA:
| Search for | Change the line(s) | To this value |
|---|---|---|
| “loca” | Z | 60 |
| “boo” | Boost Amount | 0.120 |
| “boo” | Boost Type | BoostType_Pad |
| “res” | Respawn Delay | 4 |
Remember to assign the FXActor_Boost_TA to the FXActor slot as well.